
If you are a Windows user, you might know about the Windows Defender, which is the inbuilt Windows antivirus, and malware protection system but apart from being knowing about that most of the users still tend to use up the third party antivirus programs on their devices because these programs tend to give out more potential protection as it is felt. For the users using up, the antivirus programs need up the subscriptions or the paid software then only
For the users using the antivirus programs need up the subscriptions or the paid software then only they can use it but if the users don’t want to go with that fixing then they can use the Windows Defender only and get more protection from it. By default, the Windows Defender isn’t very powerful but still, users can configure it to get more out of it and hence protect their device to another level. To know how you can also configure up the Windows Defender to better protect your PC, just read up the rest of the article that is given below. Just set up these things in the Windows Defender to make it work more efficiently.
How to Configure Windows Defender to Better Protect Yourself
The method is very simple and easy and you just need to set up these things in the Windows Defender to make it work more efficiently.
#1 Enable Real Time Live Protection
There is a function in Windows Firewall which when enabled can protect your PC from the malware and viruses by running live all the time and automatically scanning for the harmful content. Although this function is re-enabled in the Windows but still you can re-check it while if it is running or not. To Check its existence just follow up the below steps:
1. Press the “Win + I” keys so as to launch up the Settings app.
2. Now after that navigate to the “Update and Security“>”Windows Defender” option from the panel that appears.
3. On the right of the panel there will be an option named “ Real-time Protection“, and you guessed right you will have to
enable it by the toggle button.
2. Add/Remove Exclusions
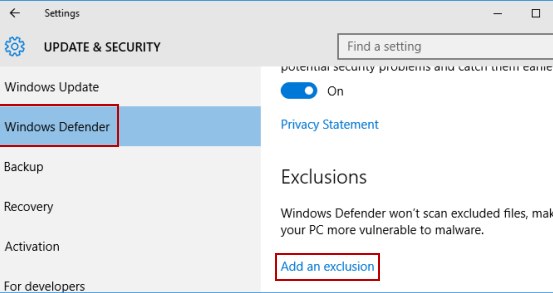
There are some of the files and folders that are actually not malicious but while in the Windows Defender scan these show up as malicious. You can then exclude these files or folders from the scan list hence the Defender would keep the higher charge of it on the next scans. You can Add/Remove exclusions by the below steps:
1. Just open up the System Settings and reach the Windows Defender settings (Check Above Method).
2. Scroll down to the option “Add an Exclusion” under the Exclusion tab.
3. Now there will be a new panel appearing on your screen, from that panel and you can easily Add/Remove Exclusion folders or files in Windows Defender.
3. Use Offline Windows Defender
You can use the defender service in offline mode to get up the most accurate results of removing malicious content from your PC. To use up the Windows defender in the Offline mode you can follow up the steps below:
1. Press the “Win + I” Keys and then navigate to the ” Windows Defender” settings from the Update and Security options.
2. Scroll down on the right panel and then click on the “Scan Offline” option. This will begin up the scan and therefore you can think of getting more advanced protection and malware, viruses removal.
4. Schedule Full Scan
The most important thing that most of the users doesn’t rely upon is that they do not go for the full system scan even if they are using the Antivirus programs too. So they are not utilizing the perfect potential of that programs and also in the case of Windows Defender the things are same. So to get more protection from the Windows Defender just try to schedule the Full system scan that will run automatically once the period comes to that time you have set up.
5. Turn on The Cloud-Based Protection
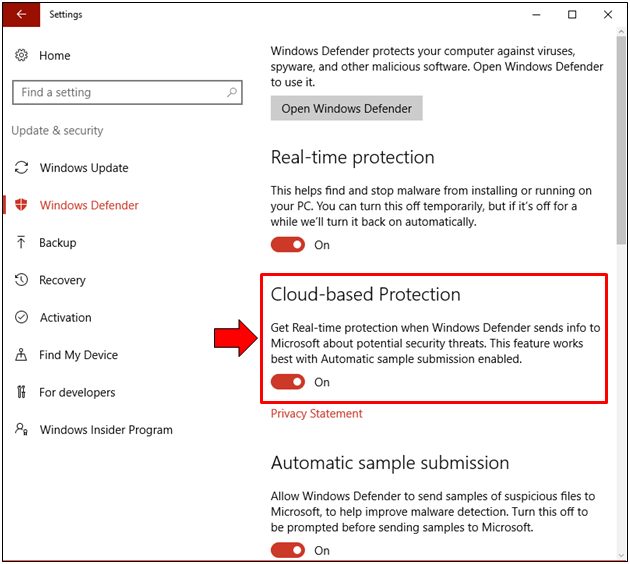
Well, Cloud-based protection is another best feature which has been added to the Windows 10. The feature is available on Windows defender setting and it provides real-time protection for you and your computer directly from the Microsoft’s security servers. You should turn on this feature as it relies upon the Microsoft’s Security servers. If you have turned on the ‘Cloud-based Protection’, then make sure to turn on the ‘Automatic Sample Submission’ option as well. To get the most out of the cloud-based protection, users should enable the ‘Automatic Sample Submission’ as well.


")