
Well, if you are using a Windows operating system for a while, then you might know about the ReadyBoost feature. It’s basically a feature that Microsoft introduced in Windows Vista. The feature allows users to use a USB drive or SD card as a memory cache.
Although not exactly, partially it acts as an offset to RAM. It helps to speed up certain features of the Windows operating system by storing application files and data as cache in the USB drive. So, it basically acts as an extra gig of RAM.
Steps To Increase RAM Using USB/Pendrive In Windows 10, 8, and 7
In this article, we are going to share a few best methods to increase RAM using USB/Pendrive in Windows operating system. We have mentioned the two best methods and a few software that utilizes the Windows Ready Boost Feature.
1. Virtual Ram Concept For Windows
In this method, we are going to use virtual memory to convert the drive space as RAM. Follow some of the simple steps given below.
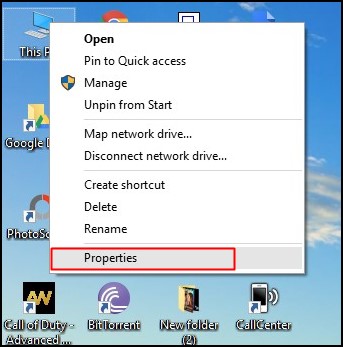
Step 1. First of all, insert your Pen Drive. Right-click on the ‘This PC‘ and select ‘Properties‘
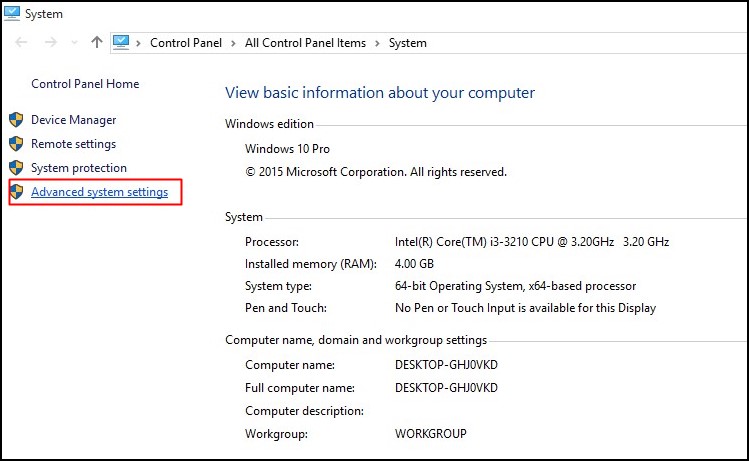
Step 2. On the System page, click on the ‘Advanced system settings’
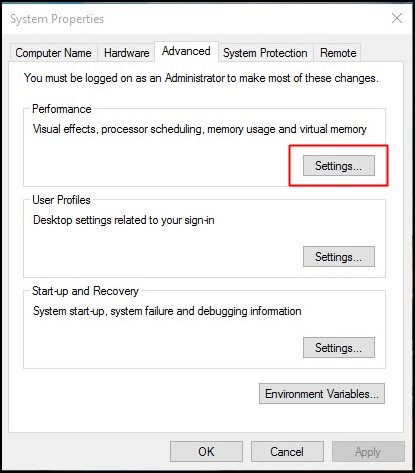
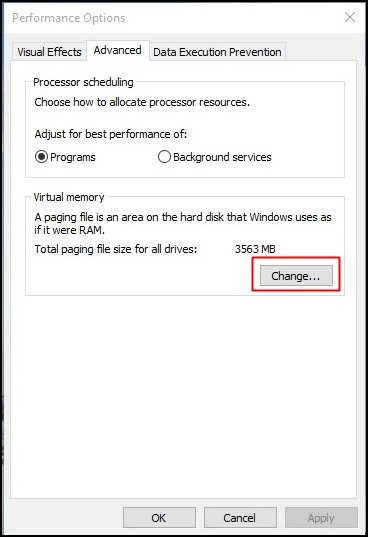
Step 3. Now select the ‘Advanced’ tab and then click on the ‘Settings’ under the Performance.
Step 4. Again a new window will appear then click on Advanced Tab.
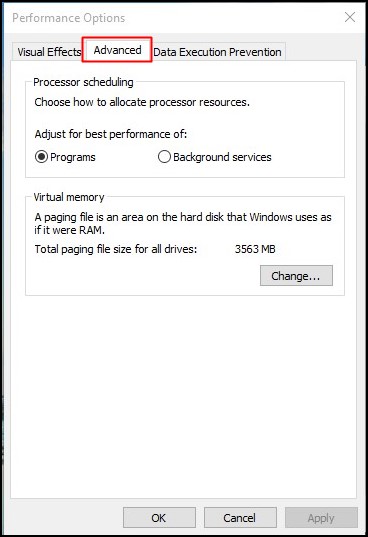
Step 5. In the advanced tab, click on the ‘Change’ button under the ‘Virtual Memory’
Step 6. Now uncheck the box of Automatically Manage Page size feature. Then in Custom Size, enter the size you want to allocate as virtual memory. Now add the same value in both boxes and click on the Apply button.
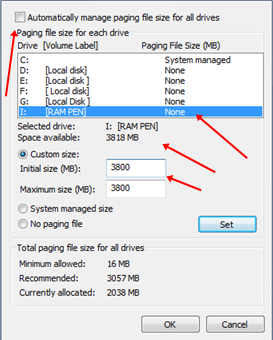
Note: Always add 10Mb less than the total available space. For example, if you have 4GB Pendrive and the current space available is 3700 Mb then use 3690 for device safety.
Step 7. If you want to revert the changes, just enable the option ‘Automatically manage paging file size for all drives’ option.
That’s it! You are done. Now just restart your PC or laptop to enable the Virtual RAM.
2. Using ReadyBoost In Windows 7, 8, 10
The latest builds of the Windows operating system have a feature known as ‘ReadyBoost’. This feature speeds up your system by utilizing the available space. Here’s how to use ReadyBoost to use Pendrive as RAM memory.
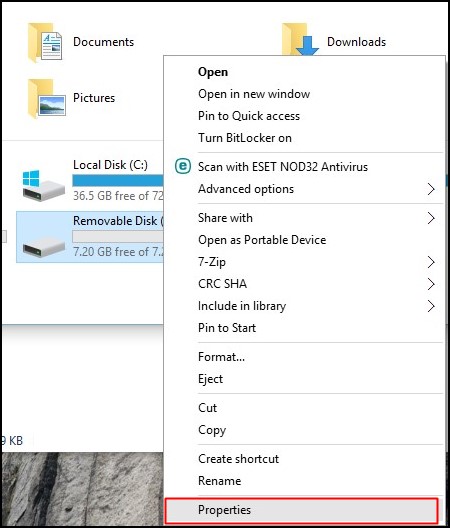
Step 1. Firstly, insert your Pendrive. Now Right-click on your pen drive and Open Properties
Step 2. Now you need to browse to ReadyBoost Tab.
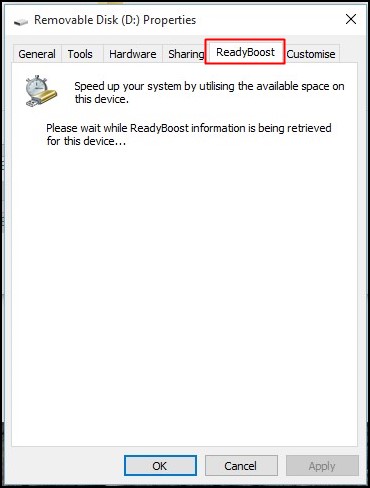
Step 3. Then select the ‘Use this device’ and reduce your current memory space. If your current device place is 4100MB, then reduce it with approx 200-300MB.
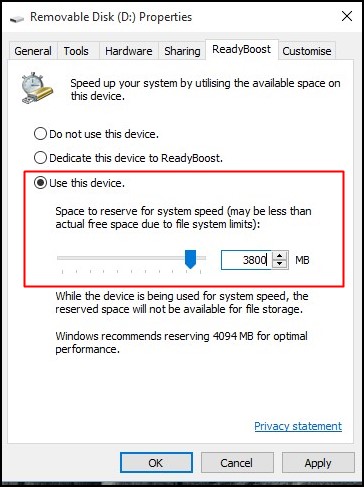
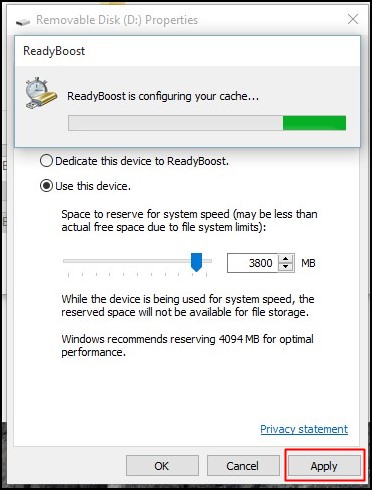
Step 4. Then click on the Apply button and all Done.
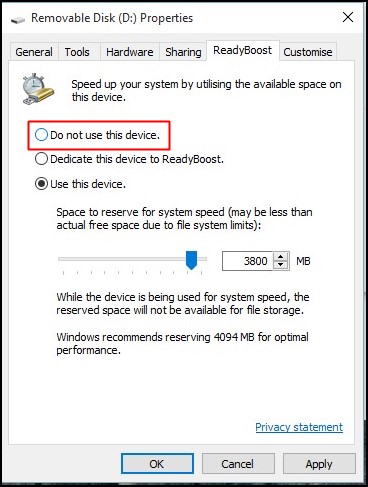
Step 5. If you want to revert the changes, just enable the ‘Do not use this device’ option as shown below.
That’s it! You are done. This is how you can use the ReadyBoost feature on Windows 10 to use Pendrive as RAM memory.
So, this is all about how to increase RAM using USB/Pendrive In Windows 8 & 10. If you have any doubts related to this, let us know in the comment box below. I hope this article helped you! Please share it with your friends also.
")

")
I am crazy to know more thx
I am crazy to know more thx
Stay Connected !! 🙂
If we insert 16GB pen drive .hw much memory in ram we will get??
Well this thing really works as the Windows introduce this method using ReadyBoost.
lol it worked for me but when i try to boost, it says my PC is too fast for it to be a benefit.
The ReadyBoost tab isn’t there, and it doesnt show up on the list on method one. ):
Did you make sure you double-clicked the correct drive instead of the “C:” drive?
Pendrive is not showing in virtual memory option i have 3.0 pendrive 32gb
Whenever I try do do it, at step 6 on part 1, it never shows other USB drives, it is 32GBs formatted to Fat32, I also tried it on NTFS.